Topographical Maps
Topographical maps, sometimes referred to simply as topo's, are very useful tools in many ways. For building your own home, they are best used in the planning stage. One of the biggest problems I see among contractors, especially those that are unsophisticated, is the lack of understanding topographical maps and how important it is to plan your work before you start.
If you are unsure what a topographical map looks like, Lifewire has a very straight forward explanation.
Why a Detailed Topographical Map is Better
|
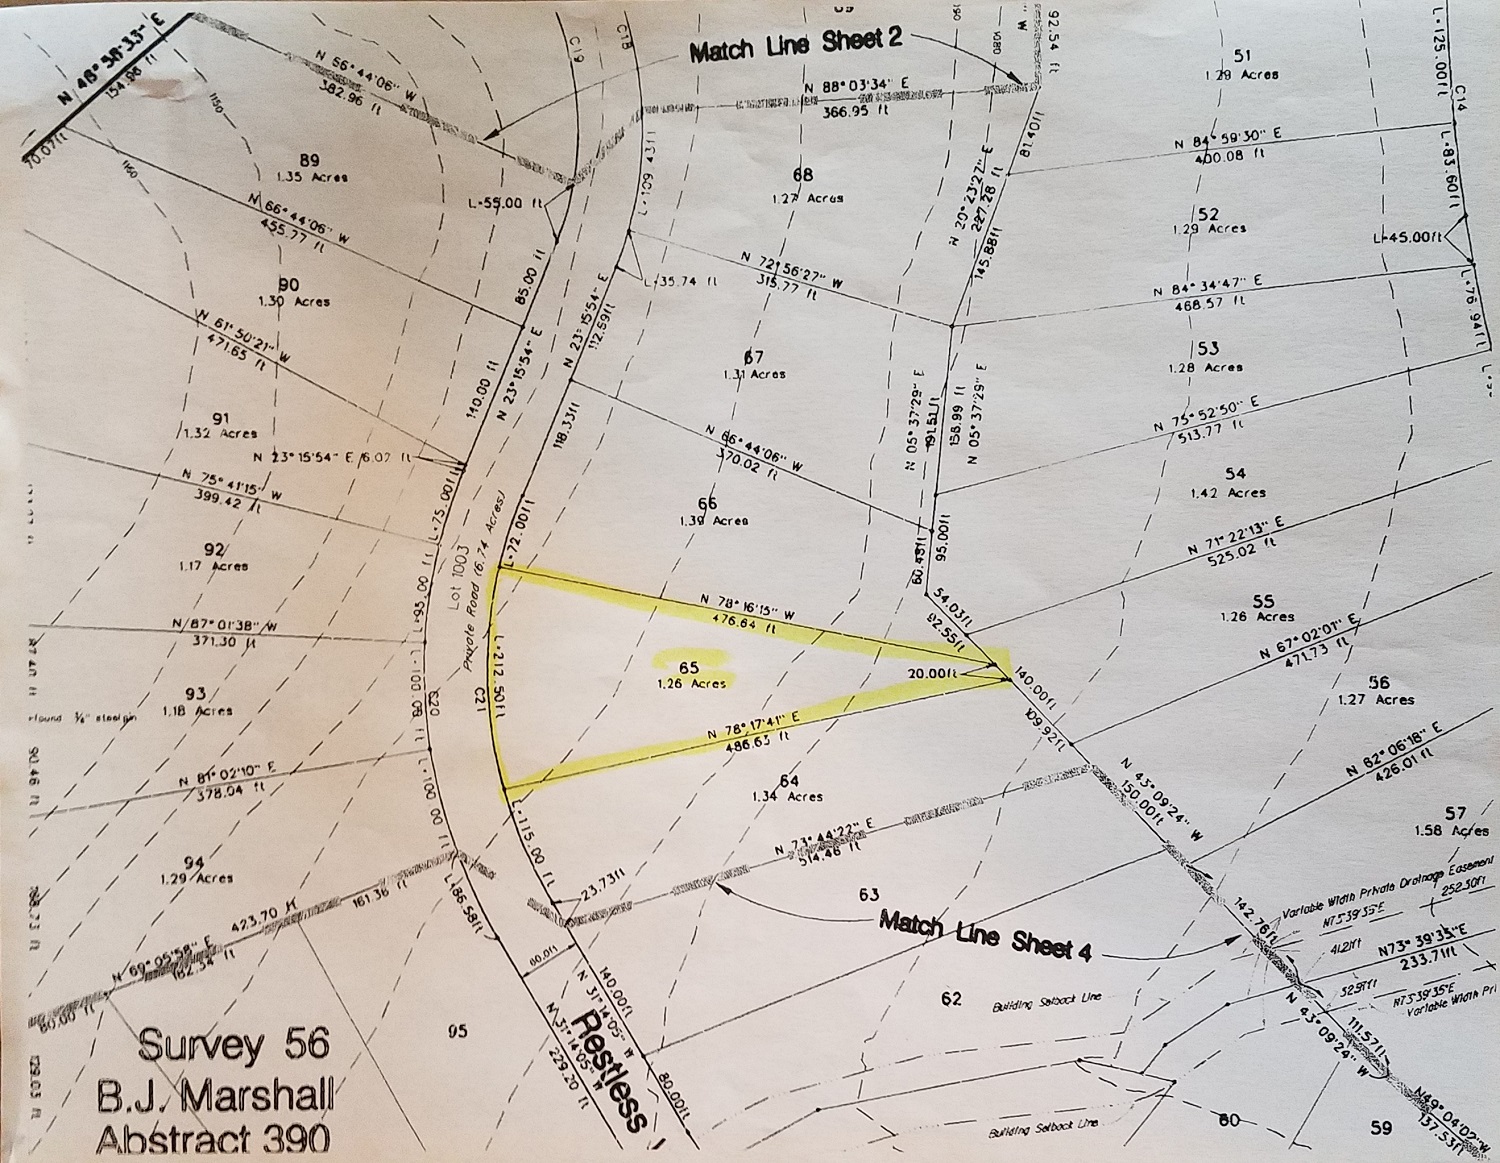
When I purchased my land, the topo map provided had the contour lines in ten-foot increments; in other words, there is ten feet of elevation between each line. The plat map with contour lines you see is of my property. I own Lot 65. This is what I was given when I purchased the property. |
 |
The information on this map alone is helpful but not enough for the planning that needs to happen. The closer the contour lines, the better idea you will have of the sloping nature of the property. Sharp slopes will be clearly visible. One of the things you can’t see on my topo is that there is a very steep slope for a short distance, then the rest of the land has a similar slope between two of my 10-foot spaced contour lines. Therefore, it is very important to have a little bit better data. The smaller the elevation change between the topo lines, the more useful your topo map will become. In my opinion, 2-foot increments is the maximum elevation change you would want, but the best distance to use for planning is the 1-foot incremental grid. This is especially true for flatter lots.

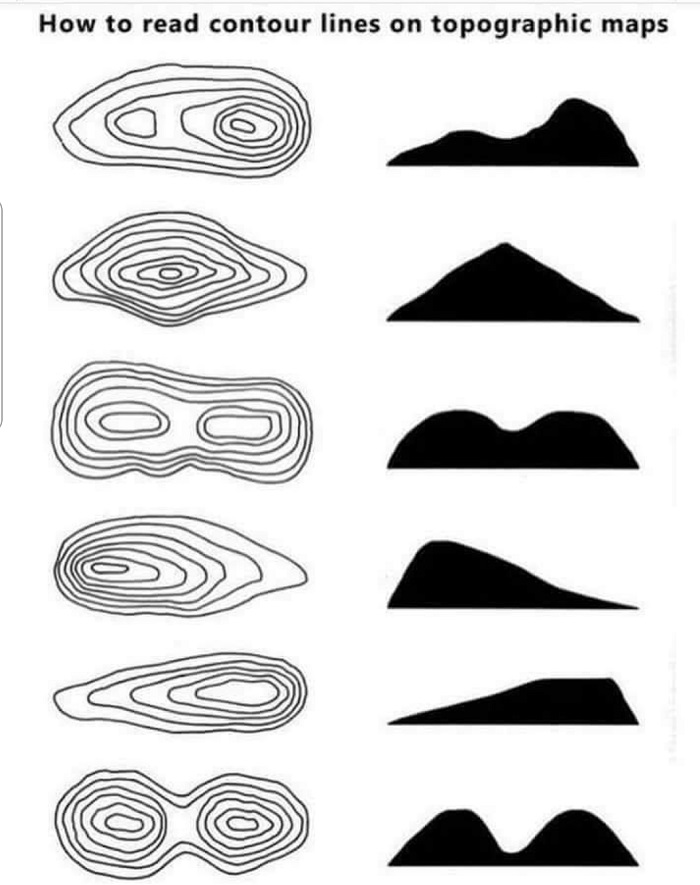
This chart will give you an idea of what the terrain looks like relative to what you can see on the horizon. Keep in mind this is a "big picture" overview.
Obtaining a Topographical Map of Your Property
Having a detailed topographical maps from which to work are extremely helpful. If you have the skills and cannot obtain a topo any other way, then you may consider creating your own.
If you purchased land in a planned neighborhood, start by calling the developer. They will know the name of the survey company who did the original work. If not, the information is usually found on the plat map. A copy of this map is traditionally provided to the buyer upon purchase of vacant land. The county recorder should also have a topographical map available for your use.
The topo map I received was not exactly what I wanted. So, I ordered an upgrade. Here is how the conversation went with the surveyor.
“Hey, I have a topo map here and I know that you have a computer file that contains this topo. What I would like to get is a topo with a 1-foot grid.”
The surveyor replied that he only had a topo of my property with contour lines as close as 2 feet. I asked how much it would cost to make the 1-foot grid topo map because I knew he would have to re-TIN the file. (Topographical maps are created and put into a computer file with the extension being ‘.TIN’.) His price was only $100 for an hour of his time. After he re-created the file and changed it into the closer contour lines, I asked him to send me a 24” x 36” hard copy.
Planning for Excavation
In a nutshell, you want to know how the water naturally runs on your property. Then you can make sure the water will still be directed away from your foundation and not trapped at any point once the house, sidewalks and driveway are graded. Using a topo on lots with less elevation change is especially important since you will not have as much room for drainage errors.
The first thing is to plan the elevation of your finished floor and the amount of footing you will keep exposed. A finished floor elevation on a very flat lot might need to be raised a little bit more than you think because of the need to run drainage water at a certain percent of slope. For example, if the water naturally flows to the back of the house, that is great. Then you would need a plan for getting the rain and/or surface water from the front of the house to the back. There are two primary ways to take care of drainage: the Natural Surface Method and the Catch Basin/Pipe Method. Chose the best method based on the amount of land you have in which to achieve your percentage of slope goals.
Natural Surface MethodThis method means to literally cut slopes next to the house for the water to run away on the surface of the ground. When we talk about cutting dirt away from the house, we typically like to have the elevation of the dirt sloping away at about 5% for at least 5 to 6 feet. No standing water should be next to the house at any time. Not even in a heavy rain. Having water soak through the soil down to the bottom of our footings is always a bad idea. Getting water down that low can cause swelling and shrinking of the soil, which in turn can crack foundations. An advantage of this method is the ability to create beautiful landscape features based around drainage. I was working on a lot where there was a particular tree the owner wanted to keep. The tree was quite close to where they wanted the front door and up a bit of a knoll. The question became, “What do we need to do to maintain the integrity of the tree and its’ root system while also accommodating the elevation needs of the home?” The owner wanted the finished floor as low as possible to the soil grade. The solution was putting a retaining wall around one side of the tree. Then I put a dry river bed between the retaining wall and the house which carried the water around to the back yard. The home owners added a wooden bridge over the river as an entrance to their wrap around porch. Then they added plants along the river’s edge to make it look more natural. Having the topographical map on this job was a great benefit. Catch Basis/Pipe MethodThe advantage of this method is you can run the grades out of a catch basin through a pipe flatter than you can on a natural surface. For example, a 6-inch storm drain pipe can easily run on a 0.5% grade which is really flat. Most contractors run water over concrete driveways and sidewalks at a 1% grade. Typically, asphalt will be laid at a 2% slope for proper water run-off. Another consideration if using this method is the volume of water that the system needs to carry. Another consideration is the type of pipe that you are using. For example, if using corrugated black ABS pipe, flatter grades are more difficult compared to a PVC pipe. The reason is, PVC pipes are made of hard plastic and do not have any ridges; therefore, are flatter and not flexible. They will hold truer to the grade. One must keep the pipe running plane. Or in other words, shouldn’t have the pipe running up and down and up and down. On the other hand, the ridges in an ABS flexible pipe are easier to use. The down side is all those little ripples/ridges will fill with sediment quickly. |
A Note About Flat Lots
One of the most critical uses of topographical maps are when you have a flat lot, like in a small housing tract. Many times, the grades are mostly flat from one lot to the next. They only have minor amounts of difference in elevation. Make sure that your finished floor elevation is high enough that you never worry about getting water near your house due to lack of ability to dig or to grade or drain. Pooling water is one of the biggest problems I see made by home owners. Some side yards don’t have much room, but the property has a fairly good-sized backyard. Any water that falls as rain or comes into the back yard in the form of surface water from one lot to the other, will need to be carried out to the front of the lot. Therefore, the flatter the surface, the more critical the use of a topographical drainage plan becomes. I suggest using the catch basin method in this instance because pipe can be installed much flatter than the natural surface method.


